Doc: Vue Router 与双向数据绑定
1. 概要
本周,我们将学习如何使用 Vue Router 实现页面间的导航,以及如何使用 双向数据绑定 技术来实现数据与视图的同步更新。这两项技术是 Vue 开发中至关重要的基础,能够帮助你管理多页面应用的路由和实现动态数据的展示。
Vue Router:Vue Router 是 Vue.js 官方的路由解决方案,用来控制页面的导航。它可以让我们根据不同的 URL 地址加载不同的页面组件(通常是 Vue 组件),而不需要刷新页面。
双向数据绑定:Vue 的双向数据绑定通过
v-model 指令,使得数据和视图保持同步。任何数据的变化会自动更新视图,而视图中的用户输入也能实时反映到数据中。目标:掌握 Vue Router 的配置与使用,能够为应用添加页面导航功能。通过
v-model 实现双向绑定,确保数据和界面的同步。
2. 新人物介绍

泷本日富美:青叶的美术组前辈,当前担任美术组长。她在完成上级委派的公司的网站完善任务时,希望能实现两个需求:1)能通过按钮从首页导航到人员介绍页面;2)在人员介绍页上展示一个人物卡片,通过按钮切换不同人物的信息,并且能够动态绑定卡片颜色和内容。
3. 基础知识
3.1 安装 Vue Router
在 Vue 项目中,我们有两种常见的方式来安装和使用 Vue Router。
方式 1:通过
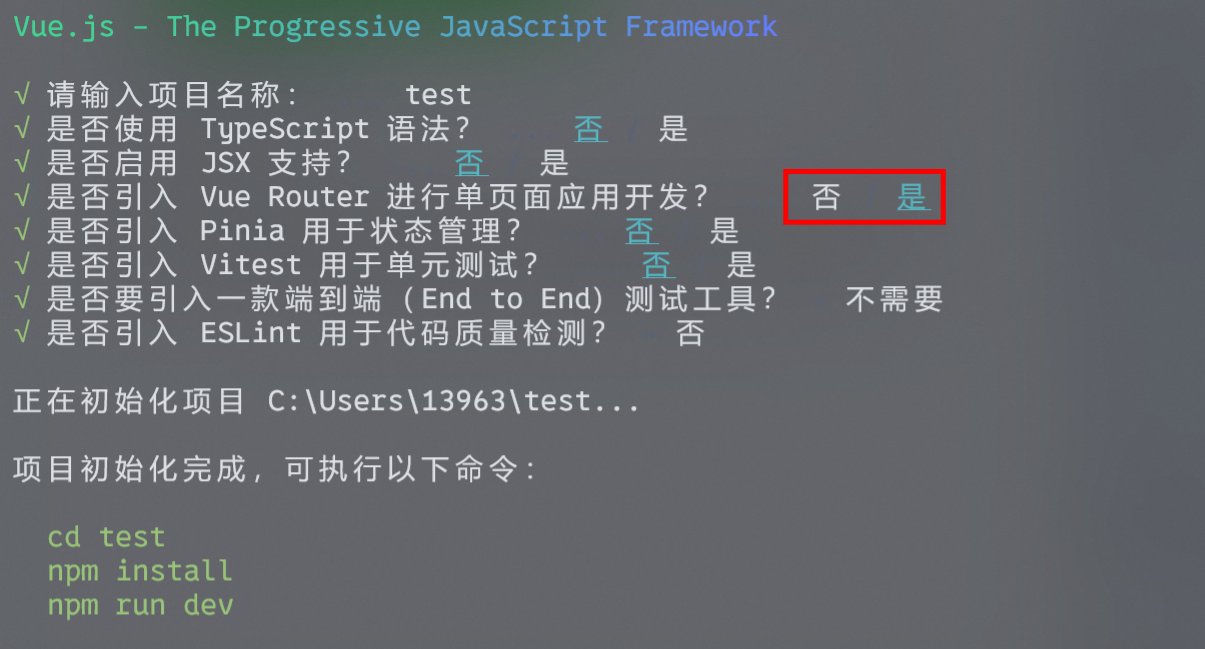
npm create vue@latest 创建 Vue 项目时选择 Vue Router 当我们通过npm create vue@latest 创建 Vue 项目时,安装过程中会提示我们选择是否需要 Vue Router。如果你选择 "Yes" 进行安装,Vue Router 会自动安装并且默认配置好,你只需要开始写代码即可。在创建项目时,会看到如下提示:
bash⬡ 是否引入Vue Router? ⬡ 否 是1
2选择 "Yes" 后,项目创建完毕后,Vue Router 会默认安装并配置好。

方式 2:手动安装 Vue Router 如果你已经有一个 Vue 项目,可以通过以下命令安装 Vue Router:
bashpnpm install vue-router1然后在项目中手动配置 Vue Router。我们目前采用方式 1。
3.2 什么是路由?
路由(Router)是指将不同的 URL 地址与不同的组件(页面)绑定起来的机制。通过路由,用户可以在不同的页面间导航,而不需要重新加载整个页面。这种机制在单页面应用(SPA)中尤为重要。
- URL 路径:它是我们浏览器地址栏中看到的链接。例如,
/home 表示首页,/person 表示人员介绍页。 - 页面组件:Vue 中的页面通常是一个 Vue 组件。一个页面可以是
Home.vue 或Person.vue 等。每个页面组件对应一个路由。
例子:
假设你有两个页面,一个是首页 Home.vue ,另一个是人员介绍页 Person.vue 。我们希望当用户访问 http://localhost:8080/ 时显示首页,当访问 http://localhost:8080/person 时显示人员介绍页。
路由配置:
// /src/router/index.js
import Vue from 'vue';
import Router from 'vue-router';
import Home from '../components/Home.vue';   // 首页组件
import Person from '../components/Person.vue';  // 人员介绍页组件

Vue.use(Router);

export default new Router({
  routes: [
    {
      path: '/',  // 根路径对应首页
      name: 'Home',
      component: Home
    },
    {
      path: '/person',  // '/person'路径对应人员介绍页
      name: 'Person',
      component: Person
    }
  ]
});2
3
4
5
6
7
8
9
10
11
12
13
14
15
16
17
18
19
20
21
22
path:路由的 URL 路径,用来匹配浏览器地址栏中的 URL 地址。component:当路由匹配成功时,显示的页面组件。
当我们访问 http://localhost:8080/ 时,浏览器会显示 Home 组件,而访问 http://localhost:8080/person 时,浏览器会显示 Person 组件。
3.3 如何使用 Vue Router
创建路由配置文件 在
src/router 目录下,创建router.js 配置文件,定义路由规则,匹配 URL 路径和页面组件。js// /src/router/router.js import Vue from 'vue'; import Router from 'vue-router'; import Home from '../components/Home.vue'; // 首页 import Person from '../components/Person.vue'; // 人员介绍页 Vue.use(Router); export default new Router({ routes: [ { path: '/', name: 'Home', component: Home // 当访问根路径时显示首页 }, { path: '/person', // 当访问 /person 时显示人员介绍页 name: 'Person', component: Person } ] });1
2
3
4
5
6
7
8
9
10
11
12
13
14
15
16
17
18
19
20
21
22在 App.vue 中添加路由视图和导航链接
App.vue 文件中需要添加<router-view> 标签,用来显示根据 URL 变化而渲染的组件,同时需要用<router-link> 来创建导航链接。html<!-- /src/App.vue --> <template> <div> <!-- 导航链接 --> <router-link to="/">首页</router-link> | <router-link to="/person">人员介绍</router-link> <!-- 显示路由组件 --> <router-view></router-view> </div> </template>1
2
3
4
5
6
7
8
9
10
11<router-link>:创建一个可点击的链接,点击后会根据路由规则跳转到指定路径。<router-view>:用来显示匹配的组件,路由会根据当前路径自动渲染相应的组件。
4. 情景式案例解读
案例故事:凉风青叶的多页面应用开发之旅
1. 项目背景与需求分析
背景:凉风青叶是飞鹰跃动游戏公司的一名新员工,负责前端开发。为了提高自己的 Vue 技术,她决定做一个多页面的人员介绍应用,能够展示公司成员的基本信息。她希望通过按钮切换不同人物的信息,并且能动态更改卡片的颜色。
需求:
- 首页显示 “欢迎来到飞鹰跃动” 的欢迎信息,并能跳转到人员介绍页。
- 人员介绍页上有按钮,点击不同按钮可以切换人物信息,并根据人物的不同动态修改卡片的颜色和内容。
2. 设计思路与技术选型
- 功能性:实现从首页跳转到人员介绍页,点击按钮切换不同人物信息,并通过 Vue 的双向数据绑定实现动态更新页面。
- 美观性:页面布局使用 Flexbox,人物卡片设计使用圆角和动态背景颜色。
- 技术选型:Vue.js + Vue Router,结合双向数据绑定实现动态更新。
3. 开发过程详解
第一步:搭建项目结构
使用 Vue CLI 创建项目,并在创建过程中选择安装 Vue Router:
npm create vue@latest选择 "Yes" 安装 Vue Router。
第二步:创建首页组件 Home.vue
<!-- /src/components/Home.vue -->
<template>
  <div>
    <h1>欢迎来到飞鹰跃动</h1>
    <router-link to="/person">
      <button>前往人员介绍页</button>
    </router-link>
  </div>
</template>

<script>
export default {
  name: 'Home'
};
</script>

<style>
button {
  font-size: 16px;
  color: white;
  background-color: #42b983;
  padding: 10px;
  border: none;
  border-radius: 5px;
  cursor: pointer;
}
</style>2
3
4
5
6
7
8
9
10
11
12
13
14
15
16
17
18
19
20
21
22
23
24
25
26
27
第三步:创建人员介绍页组件 Person.vue
<!-- /src/components/Person.vue -->
<template>
  <div>
    <h1>成员介绍</h1>
    <div>
      <button @click="changePerson('凉风青叶')">凉风青叶</button>
      <button @click="changePerson('泷本日富美')">泷本日富美</button>
      <button @click="changePerson('饭岛结音')">饭岛结音</button>
    </div>
    <div class="card" v-bind

:style="cardStyle">
      <img :src="personImage" alt="人物头像" />
      <div>
        <h2>{{ personName }}</h2>
        <p>{{ personDescription }}</p>
      </div>
    </div>
    <router-link to="/">
      <button>返回首页</button>
    </router-link>
  </div>
</template>

<script>
export default {
  data() {
    return {
      personName: '凉风青叶',
      personDescription: '凉风青叶是公司的一名前端开发人员。',
      personImage: require('../assets/qingye.jpg'),
      cardStyle: {
        'background-color': '#f3a1c0'
      }
    };
  },
  methods: {
    changePerson(person) {
      if (person === '泷本日富美') {
        this.personName = '泷本日富美';
        this.personDescription = '泷本日富美是美术组的组长,负责公司的创意设计工作。';
        this.personImage = require('../assets/hiromi.jpg');
        this.cardStyle['background-color'] = '#f0a1c4';
      } else if (person === '饭岛结音') {
        this.personName = '饭岛结音';
        this.personDescription = '饭岛结音是前端开发团队的一员,专注于网站性能优化。';
        this.personImage = require('../assets/yuin.jpg');
        this.cardStyle['background-color'] = '#f6f0b0';
      } else {
        this.personName = '凉风青叶';
        this.personDescription = '凉风青叶是公司的一名前端开发人员。';
        this.personImage = require('../assets/qingye.jpg');
        this.cardStyle['background-color'] = '#f3a1c0';
      }
    }
  }
};
</script>

<style>
.card {
  display: flex;
  align-items: center;
  padding: 20px;
  border-radius: 10px;
  box-shadow: 0px 4px 6px rgba(0, 0, 0, 0.1);
}
.card img {
  width: 100px;
  height: 100px;
  border-radius: 50%;
  margin-right: 20px;
}
.card div {
  flex: 1;
}
button {
  margin-top: 20px;
  font-size: 16px;
  color: white;
  background-color: #42b983;
  padding: 10px;
  border: none;
  border-radius: 5px;
}
</style>2
3
4
5
6
7
8
9
10
11
12
13
14
15
16
17
18
19
20
21
22
23
24
25
26
27
28
29
30
31
32
33
34
35
36
37
38
39
40
41
42
43
44
45
46
47
48
49
50
51
52
53
54
55
56
57
58
59
60
61
62
63
64
65
66
67
68
69
70
71
72
73
74
75
76
77
78
79
80
81
82
83
84
85
86
5. 总结
本周,我们通过案例学习了如何使用 Vue Router 实现页面导航,使用 v-bind 和 v-model 实现动态数据绑定。通过这些技术,你已经可以创建具有多个页面和动态内容的 Vue 应用,掌握了现代前端开发中不可或缺的基础知识。
继续实践和探索,将这些技能运用到更复杂的项目中,你将能更高效地开发出交互丰富、用户体验良好的应用。